
During these times of hardship with the coronavirus lock downs and the ranges closed, a lot of shooters are looking into setting up ranges at home to keep on practicing and also to complement the opening days of their clubs in order to be able to train when they can independently of opening hours. Most of us do not have 10 m at home to set up a proper range distance and have to look for solutions to set up in reduced distances adapting target size and height (I can only dream of setting up some kind of private 50m range for free pistol…). From the most basic to the most advanced solutions, shooters all over are trying to get some pellets flying to train and compete beyond virtual traces. And many of us want to have the convenience of an electronic target to have more reliable results and comfort.
Through a comment in social media (can’t find it again to link, sorry) I found out about the Inband Air electronic target that adapts to the distance you have, so we can all fit it in our homes. I contacted the manufacturer through their page and they quickly replied and arranged to send a Bluetooth Inband Air target for review. Virus or not I got to shoot some pellets at home and I loved it!
Table of Contents
Unboxing

View from the top with the lights on 
View from the bottom. Those two black rollers take care of pulling the black paper roll. 
The USB antenna. 
The electricity cord with a handy on off switch. 
Model sticker inside the target with electrical requirements 
The paper roll that you can check for impacts during competition.
I was surprised to see that the box was not that big, although I thought it was heavy. This was the first electronic target that I’ve carried, so I cannot compare. The Inband Air target weights 5.5kg (less than half the weight of the Sport Quantum target, which comes with a pellet trap), and needs to be installed on a wall or mount with a pellet catcher that does not come with it. You have to order one or make it yourself.
Inband has partnered with Hertar to provide kits that include everything if you (like me) are not of the DIY breed or already have a pellet catcher (like most ranges will). Unfortunately this solution becomes too expensive because of the shipping costs, so you will have to source the stand and pellet catcher locally.
Zane Jones bought the Inband Air target after seeing my messages about it in social media and came up with this solution for his basement, using a cut up mailbox, a OSB board, and some duct seal (Amazon affiliate link).
Inside the box of the Bluetooth Inband Air you will find the target with its front plate, a quick start guide, the 12v power supply, a paper roll, and some targets. If you want to have a backup in case anything goes wrong with the Bluetooth (which works flawlessly in my case) you should also order the 15m USB cable when you buy the target.
Hertar stand & pellet catcher
Because I did not have access to a pellet catcher nor could get approval to hang it on a wall, Inband had to send one they had in the shop made by Hertar (see below for more on the stand) with a .22 trap which was the only one they had available (corona virus shortages! Luckily the worst is over 🙂 ) and which is intended for use at shooting ranges and not homes (references for both below, under prices). Take this into account when you read my notes below: this stand was not made for the home use I used it for. It is a good option for ranges and the Finn are lucky to have a local company making cool targets and stands.
To setup the stand and target I did have to send a couple messages to Inband because I could not fully figure out how to set up the stand. Hertar does not have any instructions on how to set up the stand (they forget that not everybody has an engineer mind or education). It is not difficult to set up this stand, but it would make things much easier and reduce anxiety to have a simple Ikea style instructions page.
Unfortunately the stand is conceived for use at ranges and with 10m in mind, which means that:
- If you want to keep it portable to move it around your home and you have kids or dogs at home it may fall in an accident: it does not have a stable enough base for hits. Good for a club or if you can secure it to a wall.
- You cannot set it at the right height to keep your pistol arm angle at reduced distances.
If you have 10m and you can secure the stand to a wall it is a good and simple option that will save you a lot of work.
Mounting the stand and the target
These pictures should help you set up the target almost step by step. Bear in mind that the target is very heavy at the front, so you should slide more of the feet in the front (the opposite of what I did in this pictures). Remember that these are used stand and bullet trap, if you buy it new it will not have those marks and will probably be packaged differently 🙂
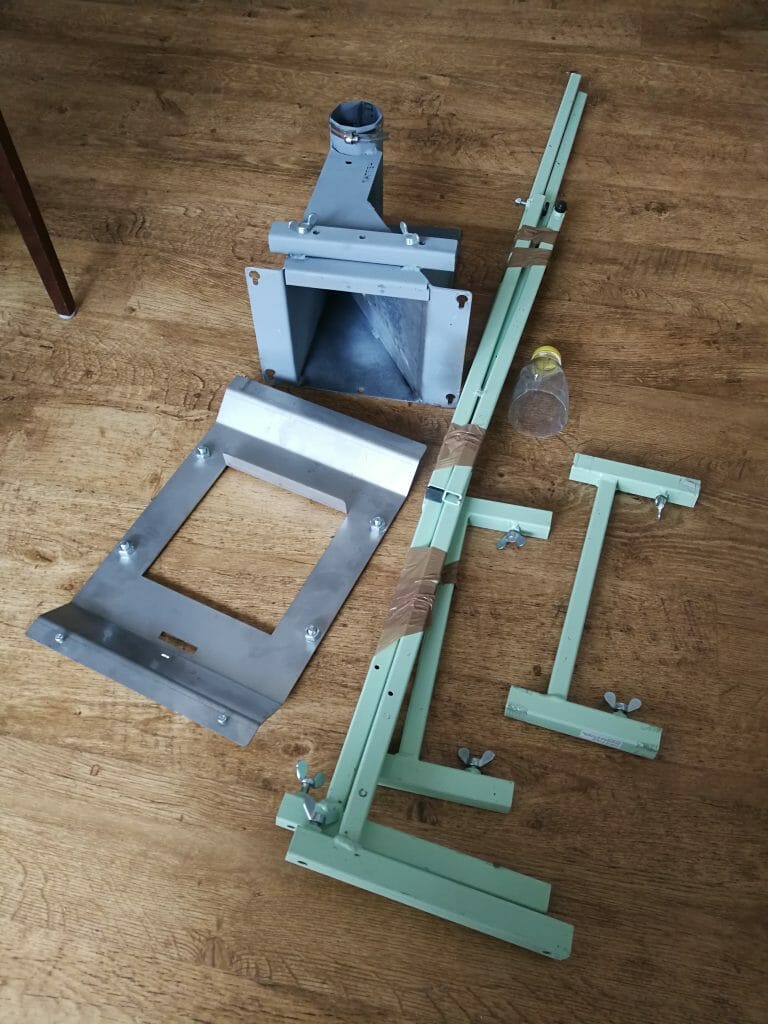
The pieces of the Hertar stand and pellet catcher with the Inband SOVITIN adapter plate. 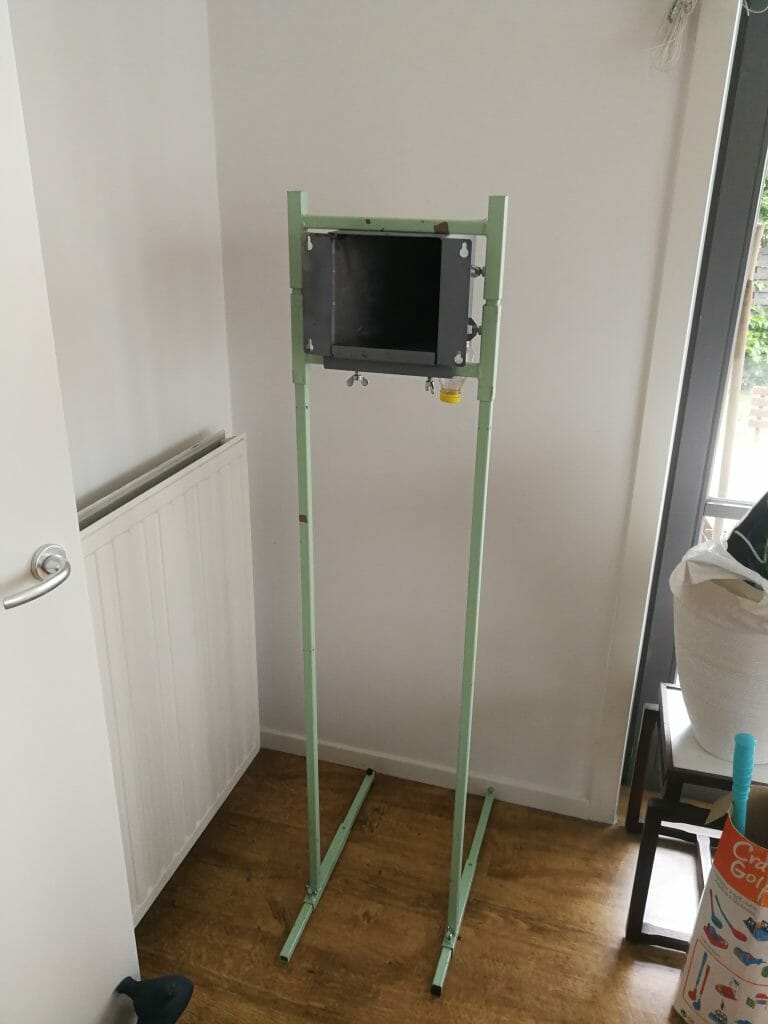
It is better to slide the feet forward so that it does not fall forward. 
The bullet trap does not go all the way back in, but it is sufficient. 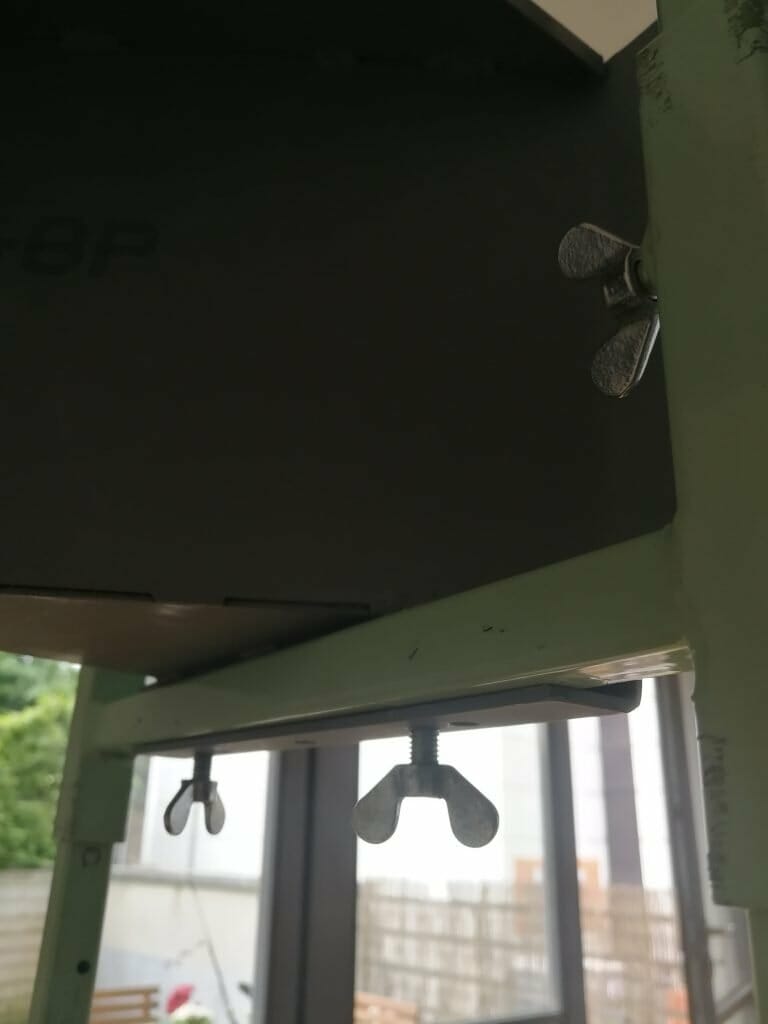
Ready to eat lead! 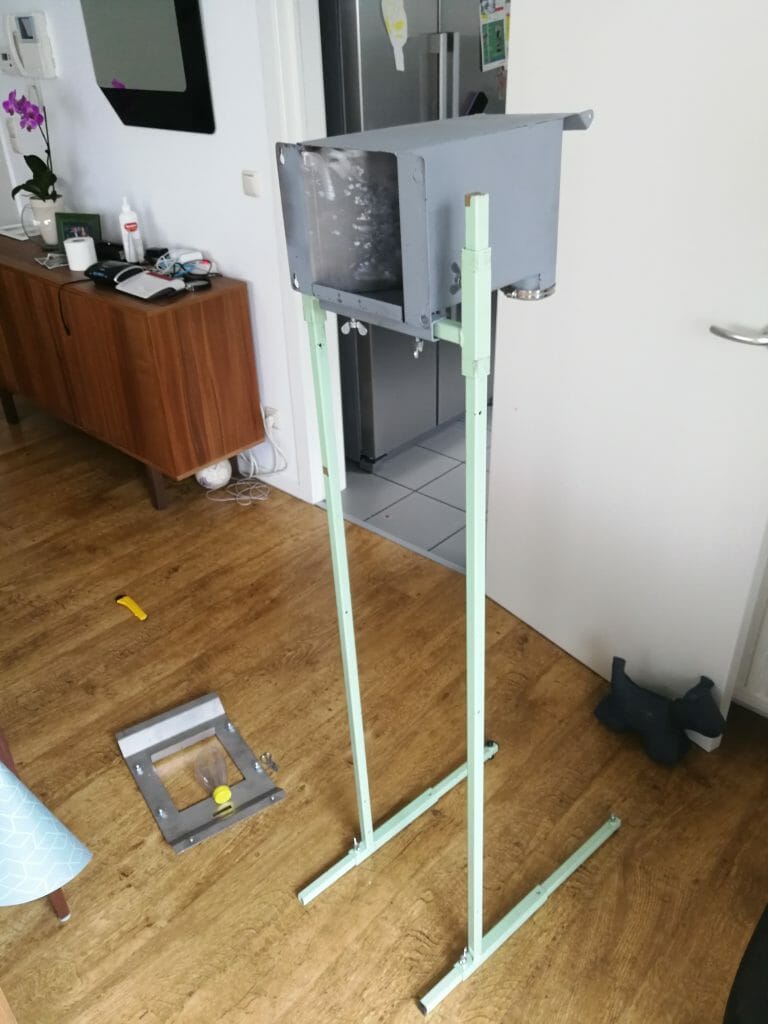
The feet are too far back. Ready for next steps. 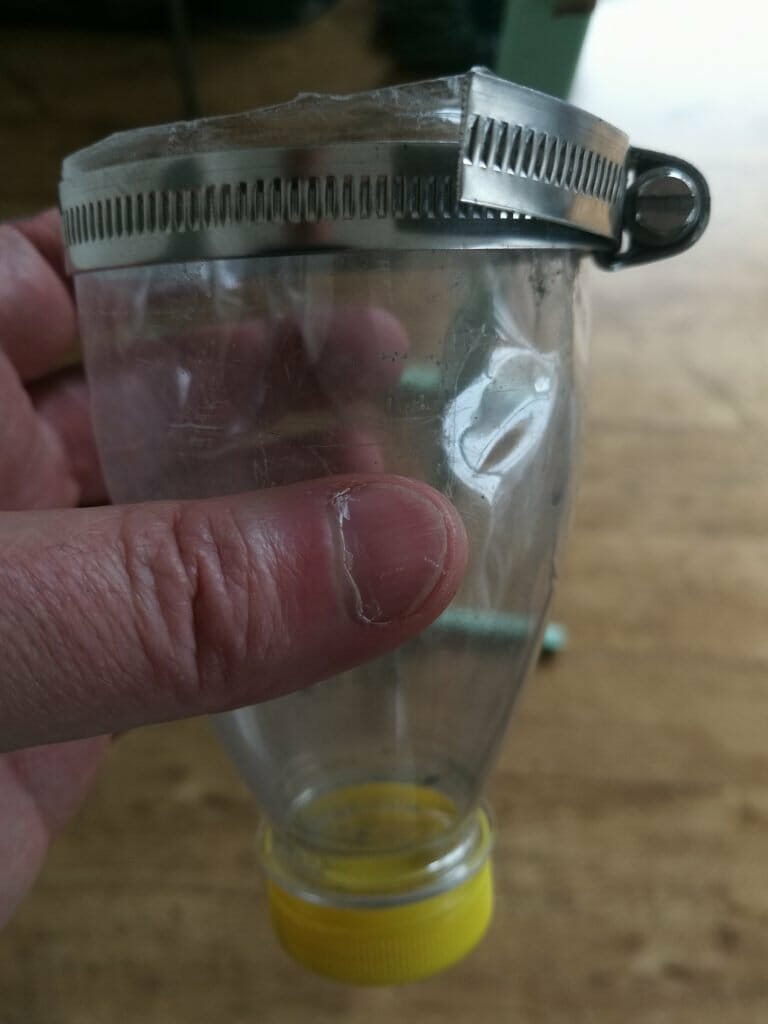
Smart and inexpensive holder for spent pellets. 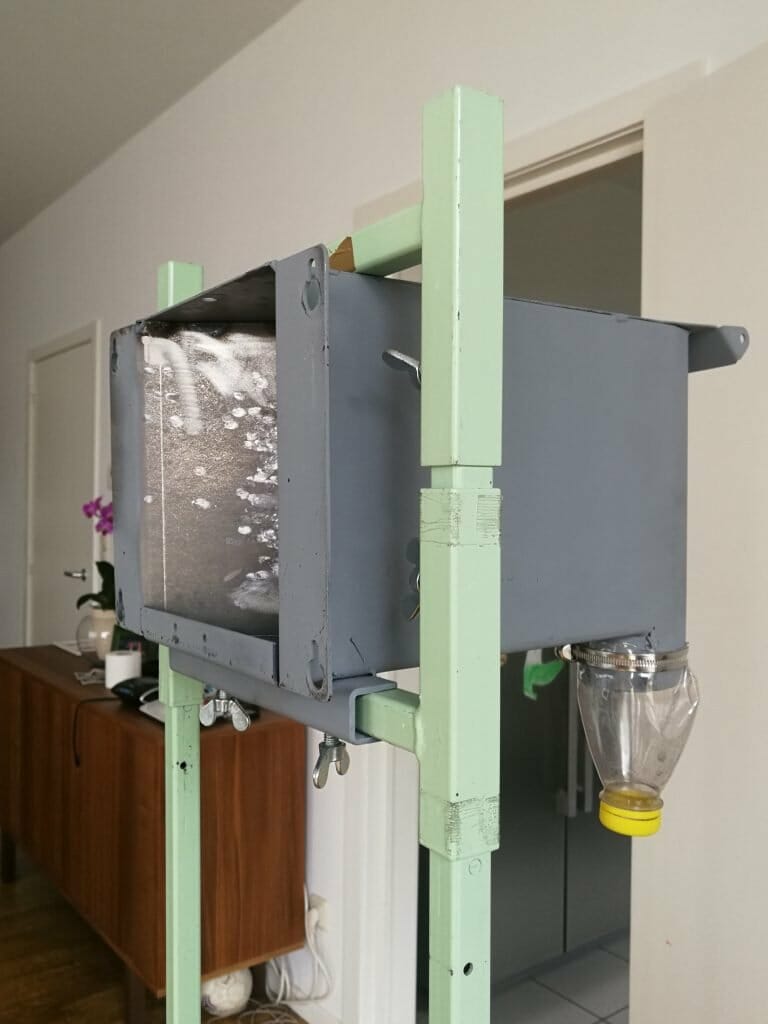
Mounted spent pellet holder. 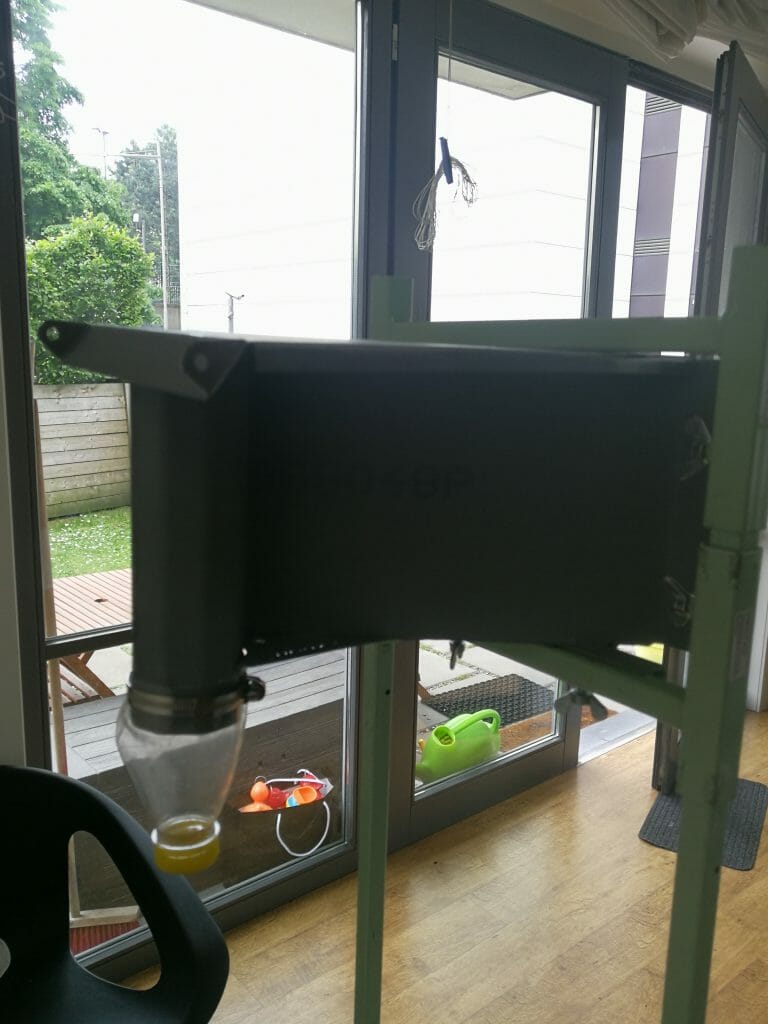
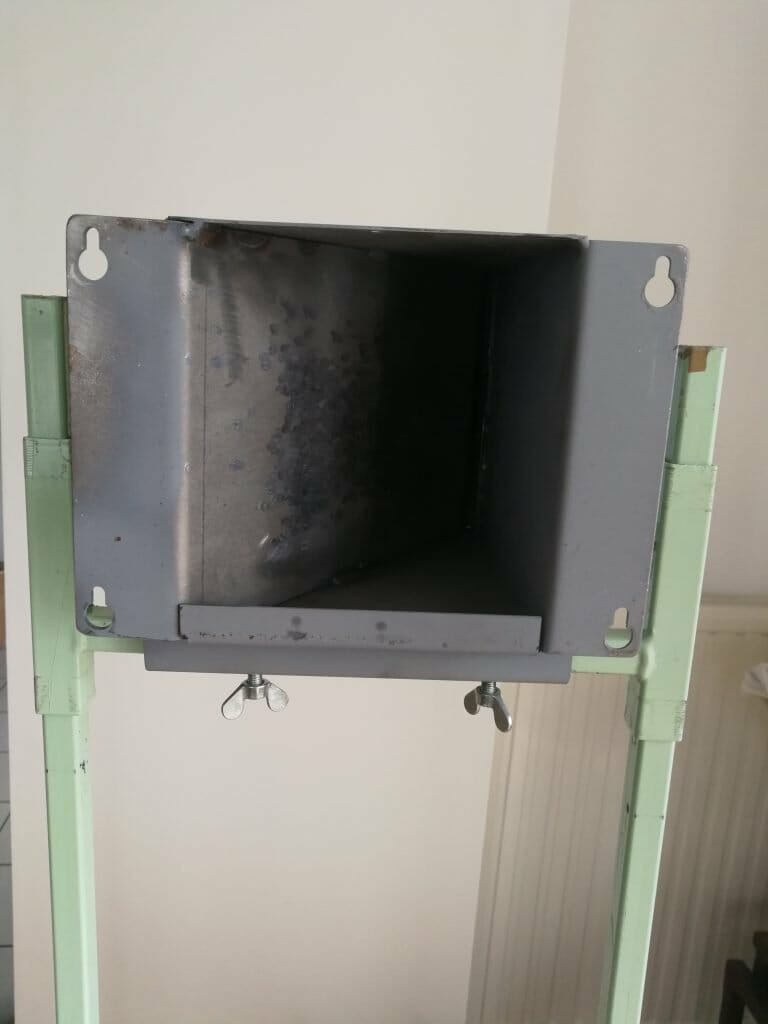
The depth of the .22lr bullet trap. 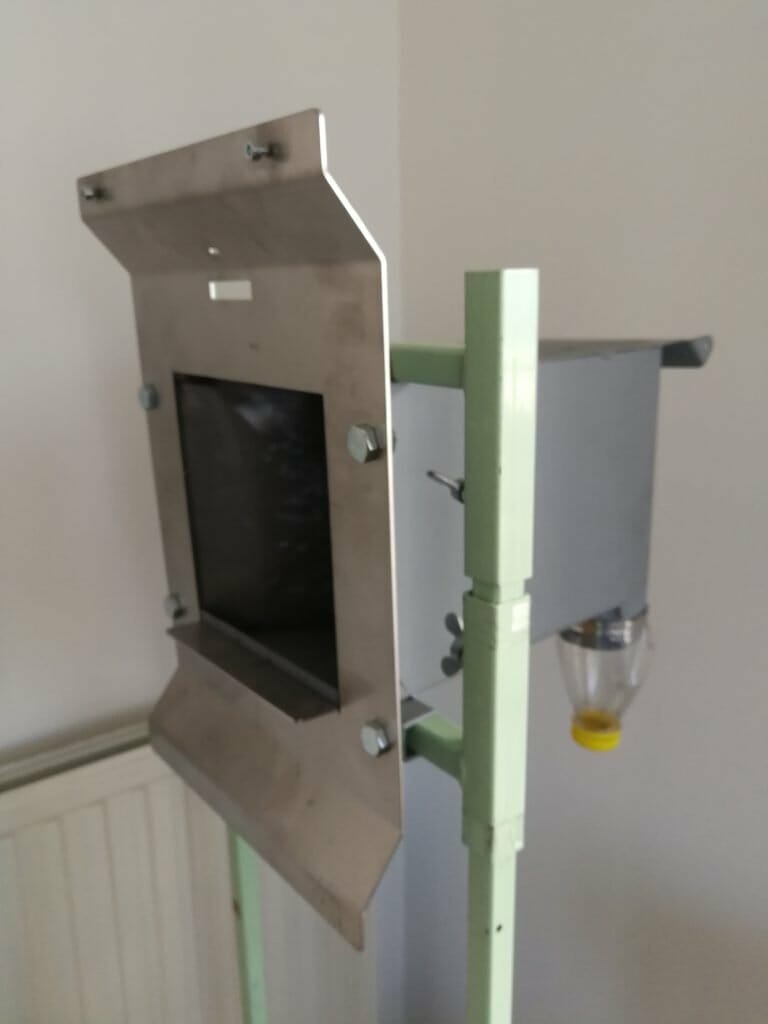
Side view with the Inband adapter. 
Front view of the Inband adapter on the bullet trap. Those are not dust bunnies, they are rests of the foam that goes in the back of the target. 
The target out of the box without the front plate. You can see the impacts from factory testing. 
Side view of the Inband target mounted on the adapter. 
With the Inband Air Bluetooth mounted and the black strip on. 
Back of the Inband target. 
Safety clip on the stand’s legs. 
You have to add a target first, then the roll… 
… then the target you are going to use,…. 
… and the magnetic target holder. (I turned the lights off for the picture.) 
Front plate mounted and ready to fire 🙂
All that is left to do is to turn it on 🙂
The Inband Air target is solid and nice looking. The light can be adjusted and at 100% (you can adapt it to whatever you prefer) exceeded 3K lumen when tested with my smartphone, well over ISSF requirements. I wish I could have mounted it on a tripod, but with its weight I don’t know if it is feasible.
The paper targets used are the same as those for Sius targets and we can use our own printed targets too. Both the rolls and the targets can be bought directly from Kruger or other vendors. The roll measures about 40 meters, so if you keep the 1cm advance they have set as the standard for training it should last about 4000 shots.
⚠ To consider when shooting at reduced distances
Be mindful of ricochets. Depending on your skill you will be more or less confident about how far you set the target. Inband does not recommend shooting under 7m. I’m sure I’m not going to ever hit the metal plate that protects the target, so I shot at a shorter distance.
You have to set up the target size and the correct height for the reduced distance you will be using. To make things simple I just use rifle targets and with the target calculator figured that I had to set it at 5.13 m distance and 1.54 m height.
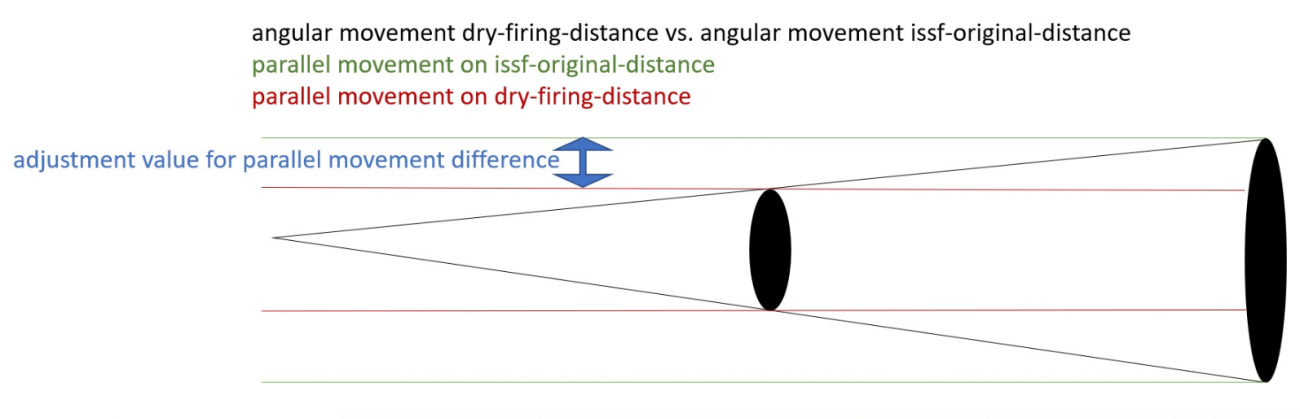
When shooting at reduced distances you have to be mindful that parallel errors will be amplified. Targets like the Inband take care of angular errors and of ignoring the size of the pellet to calculate scores and show you the impacts, but they can’t know what you are doing with your gun.
Beware of lead dust. When the pellet hits the target it will release some lead dust. I’ve not found any good sources to understand the real danger of this. Keep the room well ventilated just in case. The representative of Inband in the USA (Patrick Rowling) has this to say:
Regarding the concern about lead issues in one’s home, some information from both NRA and USA Shooting publications after multiple studies:
Firearms that use cartridges generate most of the lead contamination found on shooting ranges as a result of burning propellants and primers. Obviously, this isn’t a consideration in the air gun disciplines. However, each time someone handles pellets, a small trace of lead is left on their hands and can be transferred to other parts of their body or to food. It’s therefore recommended that hands be washed thoroughly with cold water and soap following any contact with pellets.
Backstops with hard surface deflection will obviously result in some spatter, but again, at the velocity that the pellets travel at from target-style air guns, there is very little. The soft lead and low velocity results in deformation, with practically no loss of mass. Duct media stops and collector-style traps result in practically no trace residue. For those with deflector style stops, a simple swifter (a type of wet mop with disposable sheets) of the surrounding floor area should suffice in mitigating any amount present.
Of course, it’s up to the end user to decide how much risk they are personally comfortable with, but I have no qualms about shooting lead pellets from my air pistol at 500fps into duct seal in my home. Your results may vary …
Patrick’s comment on TargetTalk.
Top
Inband does not recommend shooting under 7m. I’m sure I’m not going to ever hit the metal plate that protects the target, so I shot at a shorter distance (5.13m).
Software
There are two programs that you can download from Inband:
- Inband Scoring, which is the software that shows you the target and that most of us will only use. This review has been written with version v4.5.
- Inband Range Officer, which is used to manage competitions in combination with the Inband Scorings running in each target. The version I’ve used is v1.8.
You will probably also have to install the USB driver, downloadable from the same page as the software and manuals.
If you have problems with the USB pin, try 1234.
To detect where the shot lands, the Inband Air senses the pressure wave generated by the pellet and calculates the hit position from this. This is the reason why in order for it to work properly some form of acoustical sealing is required (it does not have to be perfect, so a paper is enough). Otherwise the pressure wave of sub-sonic bullet will reach the microphones before the pellet actually hits the target, and it would be very difficult (if not impossible) to calculate the hit point from this.
Inband Scoring
Once the target is ready, all you have to do is turn it on and execute the Inband Scoring software. The bluetooth link is quite fast and the software is very easy to understand and use.

As you can see, there is a connection status square on the right side and the options on the left. There’s also a message about calibration underneath them.
The three main screens after this are settings and Match/Practice (these two look the same but behave a bit differently).
Settings

The Settings screen is very straight forward and condensed, which saves from having to click on many tabs.
- You can set up the name of the shooter and club and the age category (M is Senior 1 Male).
- Being a Finnish target, it does include a local especiality called ilmaluodikko, which stands out not being in English.
- The IP address is used to connect the target to their software used to run competitions (Inband Range Officer).
- Lane number does not matter unless you are running multiple targets for the competition software.
- Shooting Distance % is where the magic happens for reduced distances. It defaults to 100 and you set up here how far your target is in reality. In my case, I was shooting at 5.13m so I entered 51.3%. To figure out the percentage you can use the target calculator.
Then you have how far the black roll should move with every shot. For home shooting and training you can leave it at their predefined 1cm or less (Patrick Rowling has it at 1mm and has no issues, he represents Inband in the United States). For competition if you want to use it to resolve complaints you will have to increase it in order not to have two shots on the same hole (if they do hit the same spot, the divergence of precision is less than 1mm so no real trouble in the scoring side at least for air pistol). For 50m it is set to 0 because that target uses a piece of rubber that does not have to advance.
The rest are mostly for troubleshooting. The backup files are simple text files that contain the scores of the shooter for the session and the logs are also simple text files that store the shooters’ names, dates, discipline, band move distance, all the shots (scores, X and Y coordinates, accuracy, temperature of the target, and match or practice status), if there have been connection errors, and how many shots have been taken in total, with a separate tally for good shots (those that were recorded without issues). The only bad shot that I’ve had with the target is when I set it up without following the manual and did not have the back target (my bad). This registered the shot but without a score and signaled an error on screen.
This is what the calibration screen looks like:

Match / Practice
This is the part that shooters spend most of their time. It is also very straight forward and easy to read. Just click on Practice or Match and you will be asked to choose the event.

When you click on air pistol you are taken to the screen where joy and sorrow come to play.
The difference between Match and Practice modes is that Match has a timer that you cannot touch for sighting shots and competition shots, whereas Practice allows you to shoot as much as you want for how long and you want while also being able to switch back and forth between sighting and match shots. By default, Practice starts in match mode, so you have to hit the button on the lower right of the target to change to sighting.
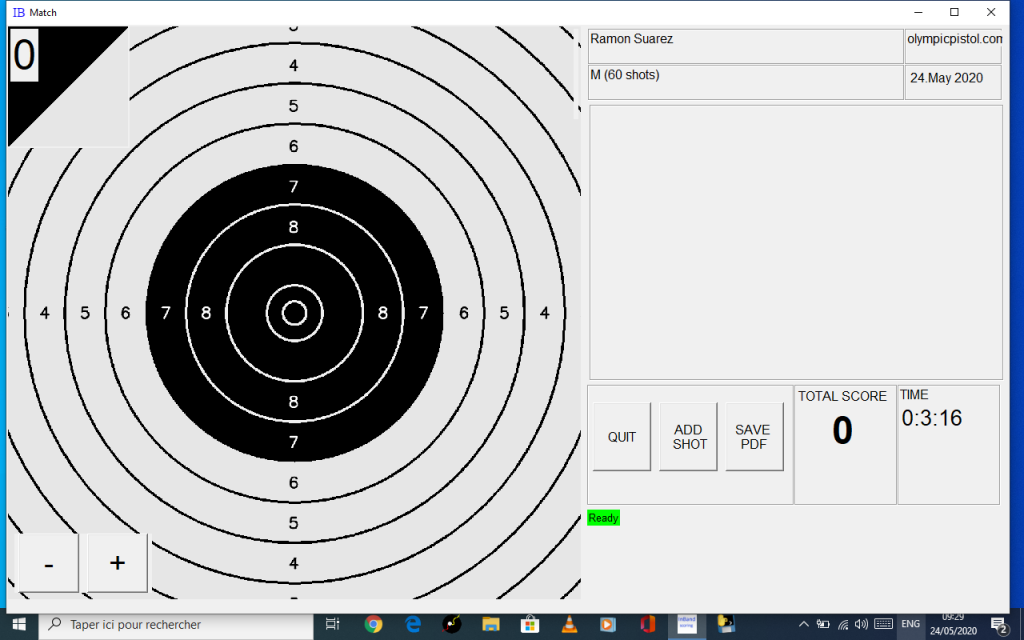
There’s no automatic zoom and you choose how much of the target you want to see by clicking on the – and + buttons on the lower left side.
The number of shots is displayed on the upper left corner of the target, and score on the upper right corner. This was a bit confusing for my first shots but has been easy to remember from shot number 11.
Nothing to do here beyond looking at where your shots landed, time and score.

The last shot is displayed in red and the rest of shots in green.

To leave the match you just click on Quit. Make sure you save the PDF with your scores before quitting or you will loose them.
Print out
This is what the print out of my first match with the Inband target. I did a test run before and I quickly felt comfortable to start shooting matches (which I send to online competitions) and practicing my training programmes.

The print out only includes the match shots. If you are in practice mode and go back and forth between sighting and match shots during the same session all the match shots will be included in the printout and the sightings discarded.
I really like the view of the independent targets and find that the print out is basic but good enough for most uses. I do have a few recommendations that you can see below under Improvements. The thing that I miss the most is that there’s no count of the different rings, only of the X, and that it does not include total time, and the discipline shot with a mention of the adapted distance.
Range Officer competition management software
Unfortunately I have not had the opportunity to test the Inband Range Officer extensively yet, but now that the quarantines are easing up and my kids are back to school I will have more opportunities to get to it. Expect an update in this post soon 🙂
You should always run the Range Officer first and then launch the Inband Scoring for the different targets.
The first thing you see when you launch the Range Officer is a terminal window that you just ignore unless you are tech curious. Then you will see a welcome screen with a few options and the most important information to connect your target: the IP address to add to Inband Scoring so that they can connect.

These are the kind of status messages you see in the command window that hides in the back:

This is what you see in the settings screen (after I clicked on Make Dummy Lanes a few times).

And this is what you see in the lane setup window when adding the information manually (you can also import it from a CSV file):

Choice of age categories 
I only have one target, so I can only set up one lane 
This image from the Inband.fi website shows what multiple lanes look like.
I did set up the competition software and the target on two separate monitors, quite a set up for my “home range”:

Before you can get to shoot your match shots, you are clearly told not to start yet. this screen capture shows Inband and SCATT running side by side and ready to begin.

Manuals
There are two manuals in English and Finnish, one for each programme, plus a quick set up sheet in English that comes with the target. The manuals are helpful and the instructions are easy to follow, with step by step guides for running both tools.
Improvements
These are some of the improvements that I think should be done and that I’ve sent to Inband to help with the development of their targets. They are very open and eager to improve, do send them yours.
Inband has confirmed that there are competition commands coming soon on top of the current options for disability shooters to hear the result of their shots. They are also working on a rapid fire mode for Standard Air Pistol. They are also fixing a minor cosmetic bug I told them about (minutes have no zero before them when the timer passes 1h).
A couple more bugs that I found were that the software resets to 100% of the distance every time you start it and that even though it shows that it remembers the percentage of light you set up it lights up with the standard intensity and you have to fiddle with it.
Must haves
- Standard ISSF categories for the ISSF disciplines.
- How many shots landed in the different rings ( X, 10, 9, 8…)ç
- Time when match started.
- How much time passed from start to finish.
- Discipline shot (10m air pistol, 10m air riffle…)
- When shooting at a reduced distance also include the effective shooting distance (not the %, the distance in meters).
- Target with all the shots in it added to the targets of each series.
- The software should record the shots with decimals always and then round them down when choosing to display on screen or paper results without decimals. This allows to take it from the backup file and import to whatever tool the shooter is using to analyze shots. If in the future they allow to stock all sessions and go back to them, it will allow to switch. In fact switching from decimals to not decimals should be done in the target screen except when in competition (the Range Officer software should control it then).
Nice haves
- Size of group, at least for all shots.
- Displacement of center of group from center of target.
- Average of all shots.
- Something to locate shots more easily in the target, either the arrows or the number of shot inside the circle (which will be hard to see at current size)
- A way of printing the targets only as wide as they have shots (auto zoom)
- 1 to ten on top of the shots and series with lines to find each shot easily.
- Possibility to remove the stay on top behavior of the Inband Scoring screen. This is done by choice of Inband and I understand its utility when used in a club computer, but for those of us shooting with the Inband targets at home it is uncomfortable. We may want to have SCATT on top of it or switch to different programmes while we are not shooting.
- Remembers the distance at which you are shooting and the light intensity after reboots.
- Inband target model and web address of Inband in the printout.
Price
The Inband electronic targets are really cheap, more than half the price of the common brands we know. They retail at €900 for the USB cabled model and €1000 for the Bluetooth model (which also has a USB port just in case). You can buy it directly from Inband or one of their resellers around the world.
The used Hertar range stand model I got from Inband is the 4008 Luotiloukku jalka Inband OL (price list) which sells for €190. Shipping is by their own terms “grossly expensive”, so unless you go pick it up yourself or live in Finland you may be better off buying something locally. The home stand they recommend is the 4007 Luotiloukku seinä I Inband OL, which is cheaper (€110) and geared towards home use.
The pellet catchers that work with these stands are the 2001, 2002 or 2004 Luotiloukku 170×170, which sell from €73 to €110. Sending one of them to Belgium from Finland would cost around €29.
Rolls cost about €10 a piece and the targets about €12 for 100.
Evaluation
The Inband Air electronic target is a great option for individual shooters and clubs that are not thinking on running international competitions (most of the ranges around the world!) who are price conscious and are looking for a no frills electronic targets that works. The Inband Air is a great upgrade from paper to electronic targets. Shooting on it has brought me joy and I think that it is fully worth the money.
The Finnish Shooting Sport association (SAL) has had the targets tested by independent experts given permission to use this target in their national competitions. Inband will not bee seeking ISSF approval because it will increase the price of the target.
I found the installation and running to be easy and straight forward. The instructions in the manuals are very to the point and simple to understand. The software would benefit from some polishing in terms of interface, but it does not detract from using it.
In the three years of its development it has gone from a hobby project to a serious upcoming contender for the established brands. They are focused on developing a low cost target while creating a sustainable business and I think they are doing a great job when it comes to the hardware and software.
If you are considering buying one or more electronic targets it is worth it to include the Inband Air in your short list as a great choice.
Just wanted to say fantastic review! I really appreciate you taking the time to document, edit, post and add the video/photos. Best of health to you and your family.
Thanks a lot Peter. I really appreciate getting some positive feedback. Best to you and your loved ones too.